Now - I need to be honest here... I'm a tried and true Melbourne girl, so when I was asked to make a rugby ball cake... well... I just didn't quite get the point. Why didn't the birthday boy want an AFL footy? And who exactly are the Crusaders? Regardless of all that, a Rugby ball seemed like such a straight forward design but I have to admit that it did take me quite some time to get it looking uniform. I also actually fretted a little with the prospect of covering the shape but due to the seam running down the centre of the ball it was easy enough to just pinch and cut away the excess icing at the join point. And although the point of the cake was lost on me I think it turned out pretty great.
So... it seems as though the classic "shooting stars" is exceptionally popular. In fact - I had two on the cards to make in a couple days! Kylie pretty much set up the girly one and I just gave her a hand to put on the finishing touches. The boy one was all me, and I think I could get it done with my eyes closed this time! They are such a great design and I would highly recommend those newbie cake decorators to give it a go... or of course you could sign up for the ever popular and AWESOME Planet Cake Basics 101 course and we could show you the tricks of the trade first hand... if you are SUPER keen and from the beautiful Melbourne you may even have an opportunity to get it taught to you by me one day! That is if you’re really lucky... (I'll keep you posted).
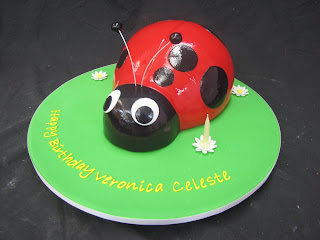
Back onto novelty cakes and I did a couple last week that made it to my favorites list. Firstly a cute lady bird cake and secondly a Penfolds red wine bottle. Although they were both 3D novelty cakes they were both set up slightly differently. Both cakes were torted and ganached as per normal. For the Lady bird I created a template out of cardboard for the cake to be built on. Once shaped I then covered it and then transferred it onto my covered base board. For the wine bottle, I actually set it up, shaped and covered it straight onto the base board. The reasons for this is the cake design, particularly the fragile neck of the bottle. If I had set it up and covered it on a template and tried to transfer it over to the base board, it would have been very difficult for me to do so without ruining the smooth finish.
Don't you think the bottle looks really life like? Well, to get that effect it was actually covered in a deep red icing colour and airbrushed with green and brown. Ritzy gave me a great demo of airbrushing and one of the key things to this shape is making sure you airbrush more heavily around the base of the cake and areas in the bottle where the "glass" is "bended" i.e. where the body of the bottle moves into the neck and the very bottom of the bottle. It is actually a little difficult to see in the picture, but in real life you can see the red icing showing through the air bushing a little. How very clever! Although I do wonder how many of you out there would be happier with a giant size bottle of wine in place of this chocolate mud cake one?
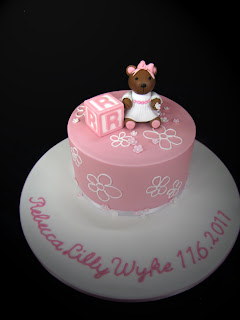
Last but not least, I had the pleasure of working on a cute pink christening cake. The design speaks for itself (and I have to admit it was awesome to work on a basic round for a change) but it did give me an opportunity to work on a figurine bear (my first at PC). I know it probably doesn't quite look like it is supposed to but it made me smile, so what more could you want? And before you start thinking of adding those cute cubes with the letters on them to your next cake design let me just give you a word of warning... they will literally suck the time out of your day and look super small for all your efforts. But by all means give it a go if you can spare the time and I'll admit it is a cute way to add in the special cake recipients initials.
So that's it for me in the production kitchen for a couple weeks. I'll keep you up to date with my progress through the courses...
Happy Caking,
Shell xx
Shell's weekly tip: GLOSS GLOSS GLOSS
 When applying a glossy finish to your cakes I would recommend using a large, flat sided, soft bristle brush. At Planet Cake we use crystalline and apply the gloss in long even strokes. The most important thing to keep in mind is that you should avoid physically touching the glossed surface onceit is applied as you will end up with finger print marks - not a good look! So keep this in mind and try to make glossing your cake one of you very last steps. And one more thing - If you plan on airbrushing your cake try glossing first and then add the airbrushing colour on top. This will prevent any colour streaking and still get a great finish.


No comments:
Post a Comment